3 Amazing Nature Crafts for Kids - Grass Head Monsters, Pine Cone Bird Feeder & Stamped Leaf · Craftwhack
If you're keen to inspire your child to beloved nature, at that place are few better means than to turn natural things into crafts. Want to make a walk fun? Promise you can brand a leaf garland later on. Want to teach them more than almost plants? Encourage them to look at dissimilar leaf shapes and talk over which would make pretty pictures.
Hither, we're going to wait at some of the best nature crafts for kids to go you lot inspired and help your child engage with the natural world on a dissimilar level.
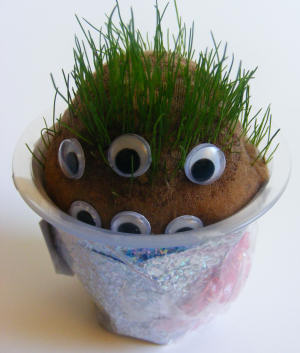
Grass Head Monsters
Source: https://www.activityvillage.co.united kingdom/grow-a-grass-caput-monster
You might remember growing a grass head from your own childhood – and if not, you might nonetheless detect these funny little heads very appealing. Children are likely to love them, and they are the perfect way to teach your child about plants' needs and how they abound.
Materials
For a grass head monster, you'll have to source:
- Grass seeds
- A nylon sock
- Googly optics
- A clear tub (e.k. a yogurt pot)
- Sawdust
- An elastic ring
- Decorations
Footstep 1: Fill Upwards The Sock
Get your child to help you sprinkle a generous layer of grass seed into the toe of the nylon sock. Next, add together a layer of sawdust on acme, creating a ball sort of shape in the sock.
Assist your kid tie an rubberband band around the sock tightly to go along all the ingredients in, and then turn the sock the other way upwardly and then that the grass seeds are at the top. You lot should make sure that the sock is tightly stretched as this will help to make information technology look more similar a face up.
Stride ii: Decorate The Yogurt Pot
Your child might want to decorate the yogurt pot with $.25 of ribbon, shiny paper, or stickers to brand information technology look more interesting. You could also add together a white sticker and write the appointment you started the projection on, and/or your kid's name, or even the monster'due south name!
Footstep 3: Decorate The Monster
Sticking googly eyes on the nylon sock is a great mode to make it more personable and interesting to the child. Let them pick some unlike colors and sizes and challenge them to make their monster look weird.
Yous can also use a black mark pen if you desire to draw on the monster's head to add a mouth, nose, eyebrows, etc.
Step 4: Water The Monster
Water the monster and talk to your child most what grass seed needs. Explicate how the seeds will sprout, and consider looking up videos online to learn more about this process. If you can, get your child to help you water the grass head or even take responsibleness for watering it over the side by side few weeks.
After a while, you should start to come across the grass sprouting, giving your kid's monster "hair" on top of his head. Let your child bask how it grows, and ask them if they'd like to give the monster a haircut once information technology is established!
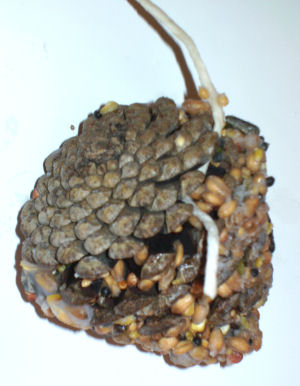
Pino Cone Bird Feeder
 Source: https://world wide web.activityvillage.co.uk/pinecone-bird-feeder
Most kids are fascinated by birds, and many don't get a chance to see them up close. Kids likewise love the idea of being able to aid other animals, and so if your child is interested in the idea of feeding the birds, this is a wonderful craft to practice if you can find a pine cone or two.
Materials
To create a pine cone bird feeder, you're going to demand:
- A large pino cone
- Birdseed
- Cord
- Lard
Step 1: Create The Hanger
Become a length of string and help your child to tie it around the widest role of the pine cone. It's important to tie it tightly, so the feeder won't autumn when birds land on it and jostle it.
Use a natural cord so that if it does come loose and go lost, it will suspension down harmlessly rather than damaging the environment.
Step ii: Mix The Filling
In a large bowl, help your child to stir together the seed and lard. If the lard is a bit besides hard to stir, place it in a warm infinite for a while, and then have another go.
Make sure you lot mix plenty of seed in for the birds to peck at. Your child will dear the idea of feeding the birds, but don't let them get also carried away with the quantities.
Footstep 3: Fill The Pine Cone
Coil up your sleeves and fix to get a bit messy – or at to the lowest degree your child's sleeves. Layout some newspaper to contain any bits, and then assist your child press the lard and seed mixture into the cone'south nooks and crannies.
Fill the pino cone prissy and full so that the birds can get maximum enjoyment, and then let your kid choose where to hang information technology.
Stride four: Refill As Needed
1 of the best things about this craft is that it has an ongoing use as a bird feeder. Whenever it gets empty, y'all can mix upwards some more bird seed and lard, and aid your child refill information technology, and hang it dorsum exterior. This is the perfect way to brand both your child and the local birds happy!
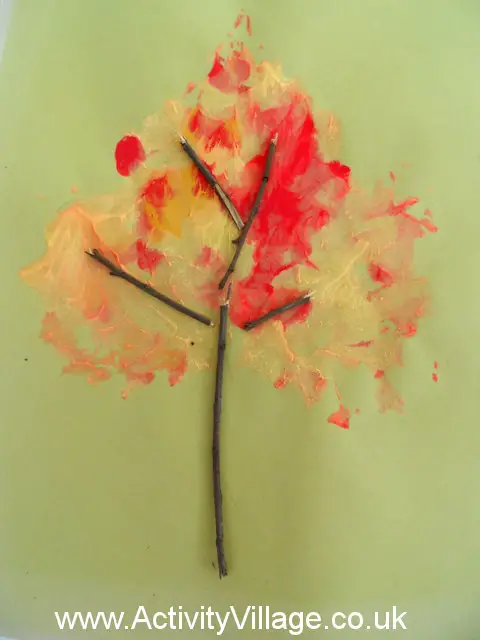
Stamped Foliage
Source: https://www.activityvillage.co.uk/stamped-leaf-tree
Materials
For stamped leaves, yous'll need:
- A handful of unlike shaped leaves
- Paint in different colors
- A paintbrush
- A big sheet of paper
- Some twigs
- A glue gun
Pace 1: Get together Upwards Some Interesting Leaves And Sticks
Perchance yous're going out on a walk, or you can selection some upward from your garden? Encourage your child to collect some leaves in different shapes and sizes, and talk to them about what they've picked.
You tin can inquire them to place the unlike types of leaves or ask them why some trees lose their leaves in winter and other trees don't. This is a great manner to comprise learning into your leafage craft.
Take hold of a few sticks too; these should be thin and have lots of little branches, rather than stocky or unproblematic straight lines.
Step ii: Paint The Leaves
Once you're dorsum indoors and yous've assembled appropriate painting gear and pigment-proofed your surface with newspaper, it's time to get printing those leaves. Spread out a big sheet of white paper for your child to work on, and pour out a option of paints.
Spread the leaves out and get your child to paint them using whatever colors they like. Some people do this using just autumn colors, but yous can cull whatever colors you or your child like best, and let them get as inventive as they want to.
It may assistance to encourage your child to simply do one foliage at a time so that you tin go on things under control and don't end up with painted leaves upside down on the floor or under somebody'southward elbow by mistake.
Footstep iii: Stamp The Leaves Onto The Paper
When your kid has finished with a foliage, help them to turn information technology over and press it neatly onto the paper. Utilise the stem to peel information technology back so you don't smudge the pattern, and and so ready the leaf aside. You lot've got your first leafage print!
Assist your child work through the unlike shapes, printing each one onto the newspaper as y'all get. Y'all could overlap them to form a border or requite each one its own space to stand proud like a tree.
When you take finished with the leaves, give them a quick launder and they can go back outside. Let the painting dry.
Pace 4: Add The Sticks
You can utilise white glue for this, but you will speed the process up with a gum gun – merely make sure your little ane doesn't get hold of it.
Before you stick anything, check how the leaf looks by setting the twig on the leaf. If y'all and your child are happy with the look, get sticking! This is a great way to make your leaves look more like trees if you desire to get for that effect.
Yous could also use a pencil or pen to draw in the stem and some of the veins yourself if y'all aren't certain about the stick addition.
Tip: Leaf Cards Brand Wonderful Cards
If you want some handmade Christmas or birthday cards, leaves can be a wonderful way to guide your little one's artistic talent. White leaves on a blackness background will look amazing at Christmas, especially if you surround them with some silver stars. Alternatively, brilliant colors on white will do nicely for birthdays or anniversaries.
You tin spray a quick layer of varnish over your leaf cards if you want to seal the paint in and reduce the hazard of it getting rubbed off or chipped.
Conclusion
Doing nature crafts with your little 1 is such a good manner to go them talking about the planet and how it works, which is a swell foundation of involvement to lay.
As more than and more of us look for means to engage with the natural earth, you volition be teaching them valuable lessons early, and letting them create and explore at the same time.
connorscattesidn88.blogspot.com
Source: https://craftwhack.com/nature-crafts-for-kids/
0 Response to "3 Amazing Nature Crafts for Kids - Grass Head Monsters, Pine Cone Bird Feeder & Stamped Leaf · Craftwhack"
Post a Comment